
How to crochet the ribbed V-stitch (easy step-by-step tutorial)
The ribbed V stitch is a classic crochet stitch known for its texture and stretch. Widely used across the global crochet community, this stitch is shared here as a tutorial based on my personal method, while acknowledging its long-standing place in traditional crochet patterns.

This post may contain ads and affiliate links, which help support Crafting with Beth at no extra cost to you. For more information, please see our Privacy Policy, Cookie Policy, and Affiliate Disclosure. Thank you.
The ribbed V stitch is a textured crochet stitch that creates a beautifully stretchy fabric with a subtle ribbed effect. It is commonly used in a wide range of projects, including blankets, garments, scarves, and accessories, where flexibility and structure are both desired.
This stitch is part of the shared crochet pattern tradition and has been used by crafters around the world for many years. The tutorial and instructions provided here reflect my personal method of working the stitch and are shared for educational purposes. While the presentation and guidance are my own, the stitch itself is not an original design.
You will need the following:
- Wool / yarn suitable for a 4mm hook, I am using Stylecraft yarn
- 4mm crochet hook, in this tutorial I am using Tulip Etimo Murasaki crochet hook
Step by step instructions
Crochet stitches standard: I am using the US / International standard crochet terms.
Let’s get started
Tension is very important. The yarn must glide smoothly from your tension hand to your working hand — not too tight, not too loose — and follow the gauge of your hook.
Featured stitch: V-stitch
Make a double crochet into a specified space, chain 3, make another double crochet into the same space.
Foundation chains
The Ribbed V-stitch is a multiple of 6 + 4. To create a sample tension, in this demo like my video, chain 36 + 4, that’s 40 chains in total.
Row 1
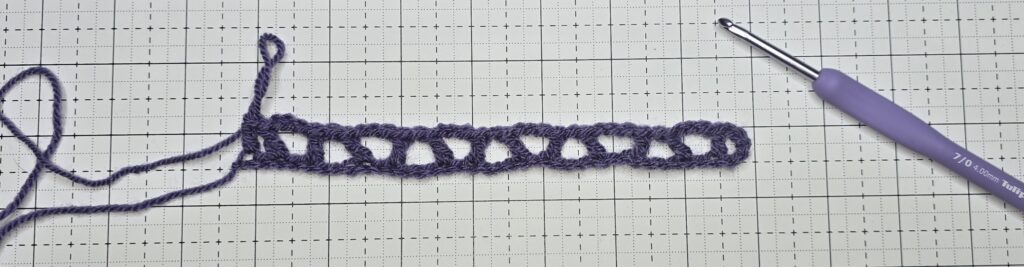
To start the first row, make a double crochet on the 6th chain from the hook. chain 3, skip the next chain, and make a double crochet into the next chain. * chain 1, skip the next 3 chains, and make a double crochet into the next chain, chain 3, skip the next chain, and make a double crochet into the next chain. We can call this stitch as wide V-stitch. Repeat * until there are 2 chains left. Skip the next chain, make a double crochet into the next chain.
Check: You don’t make a chain 1 after the last wide V-stitch
Row 2
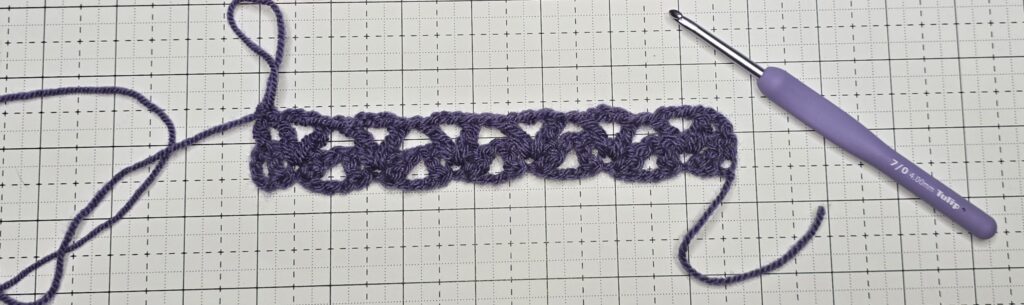
To begin with the second row, while in row 2, and then turn (counter clockwise)
Into the next wide V-stitch, yarn over, and into the chain 1 space between the legs of the stitch, insert your hook, not just up to the chain loop, but all the way through (inserting your hook through the whole of the v-stitch), then yarn over and pull up a loop, make the loop taller up to the height of the second row, then proceed with the double crochet (we can call this as tall double crochet), chain 3, make another tall double crochet the same way into the same chain 1 space. You have made the first true v-stitch, but taller. * Chain 1, make a tall v-stitch into the next wide v-stitch until the last wide v-stitch. Make a double crochet into the top of the 5th chain at the beginning of the previous row.
Row 3
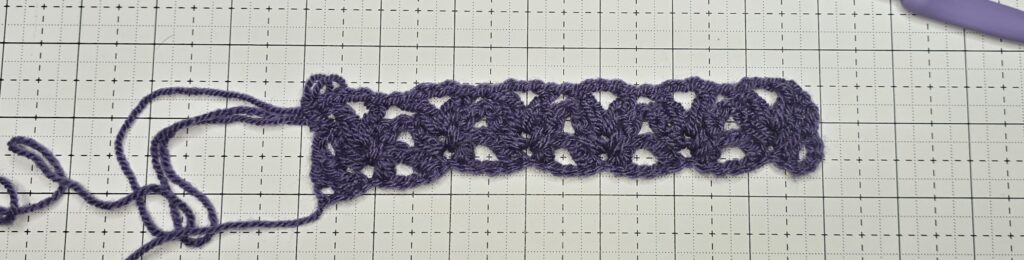
The third row is the beginning of the 1 row repeat for this stitch.
To begin with the third row, while on the second row, chain 2, and then turn.
Into the next tall V-stitch, between the stitch, find the hidden chain 3 space, not the one at the top of the V-stitch of row 2, but the chain 3 space from row 1 (previous 2 rows). So into that space, make your way and make 1 tall V-stitch, that is inserting your hook, not just up to the chain loop, but all the way through, then yarn over and pull up a loop, make the loop taller up to the height of the third row, then proceed with the double crochet, chain 3, make another tall double crochet the same way into the same chain 3 space. * Chain 1, make a tall V-stitch into the next tall V-stitch. Repeat * until the last V-stitch. Make a double crochet into the top of the 2nd chain at the beginning of the previous row.
Row 4
From row 4 and beyond, repeat row 3 for how many rows as you like.
This is the ribbed V-stitch
© Crafting with Beth.
This pattern describes a common crochet technique. While crochet stitches and methods are not copyrightable, the written instructions, photographs, and explanations on this page are original and protected by copyright.
Made with care and shared with love. You may sell finished items made from this pattern, but please do not copy, reproduce, or redistribute the written instructions.
Please credit Crafting with Beth when sharing your work.
